Goods and Services Tax (GST) was launched in India on 1st July 2017. It is an indirect federal sales tax that is much easier to understand and comply with. Every business that has a turnover of ₹40 lakhs or more (₹10 lakhs for businesses in the North East and hill states) needs to pay GST. Before that, however, they must register themselves as normal taxable individuals, and that is called GST registration.
How to proceed with GST registration?
GST registration is a complicated process, but thankfully, it can be done online. There are two parts in it and here’s a step-by-step to each of them.
Part-A of GST registration application
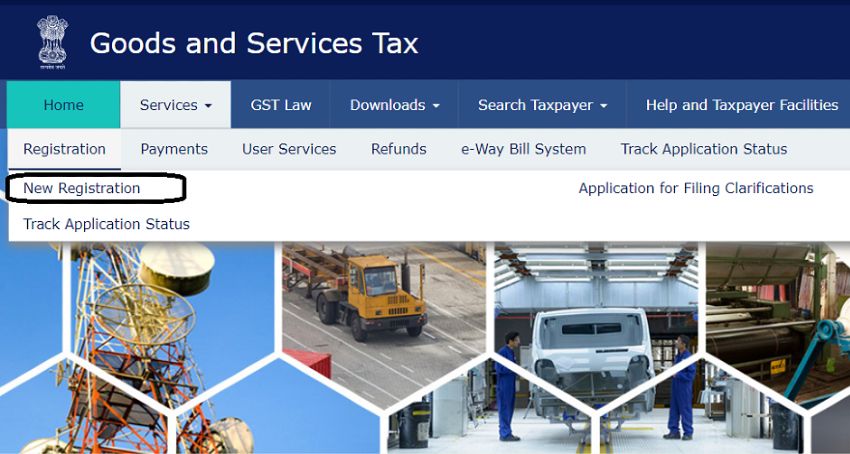
- Head over to the GST Portal. Click on Services and then hit the ‘Registration’ tab. Select ‘New Registration’ thereafter.
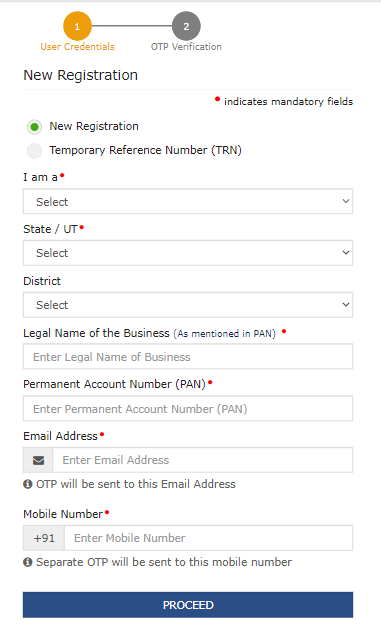
- Now you need to enter the following details:
- Select the New Registration radio button.
- Select ‘Taxpayer’ in the drop-down under ‘I am a.’
- Now, select State and District from the drop-down.
- Enter the Name and PAN of your business.
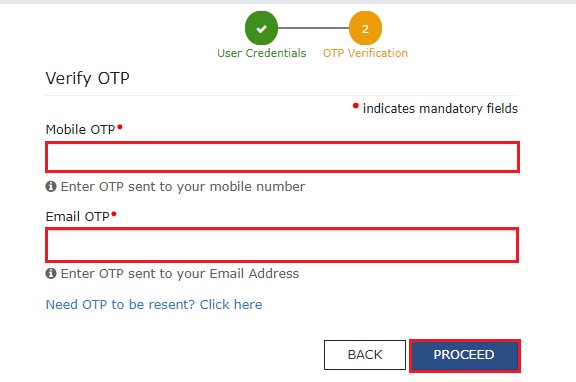
- Enter the relevant Email Address and Mobile Number. Put the captcha code to receive an OTP.
- Hit Proceed.
- You will receive two different OTPs on the email address and mobile number. After entering that, click ‘Proceed’.
- You will receive the 15-digit Temporary Reference Number (TRN) now. This will also be sent to your email address and mobile number. Keep this TRN handy with you.
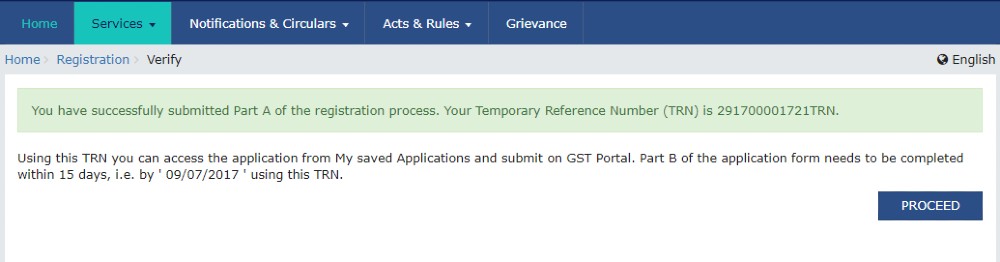
- This completes Part A of the process. You need to complete filling the part-B details within the next 15 days.
Part-B of GST registration application
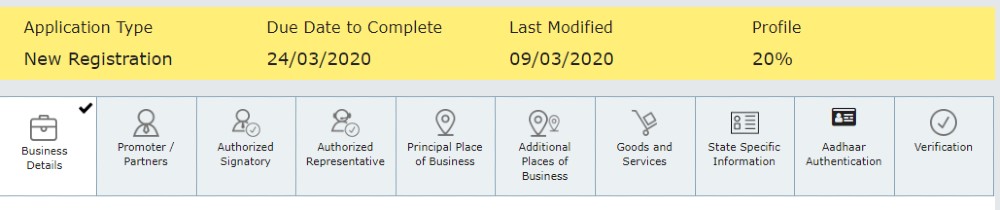
There are in total 10 sections in Part-B. Let’s see how to fill them.
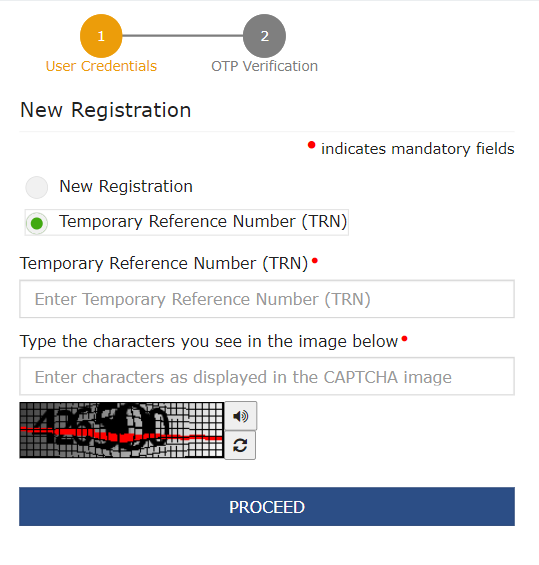
- After completing PART-A, go to the GST Portal and select the ‘New Registration’ tab.
- Enter TRN and the captcha code and click on Proceed.
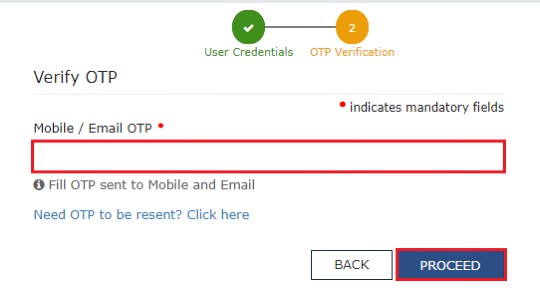
- You will receive an OTP on the registered mobile and email. Enter the OTP and click on Proceed.
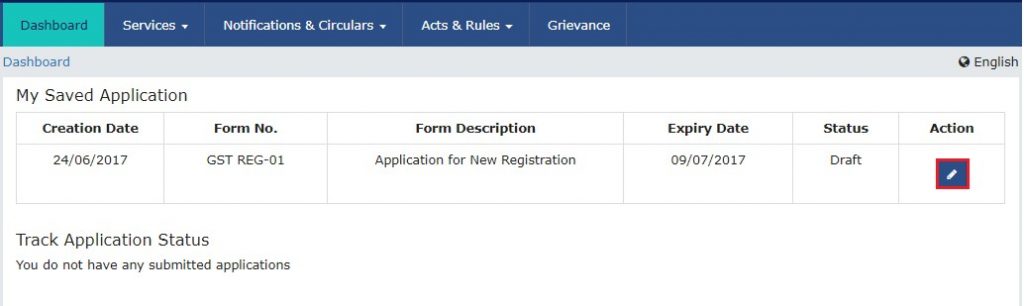
- You will see that the status of the application is shown as drafts. Click on the Edit icon.
- Under the Business Details section, you need to enter the trade name, business constitution and district. A trade name is different from the legal name of the business.
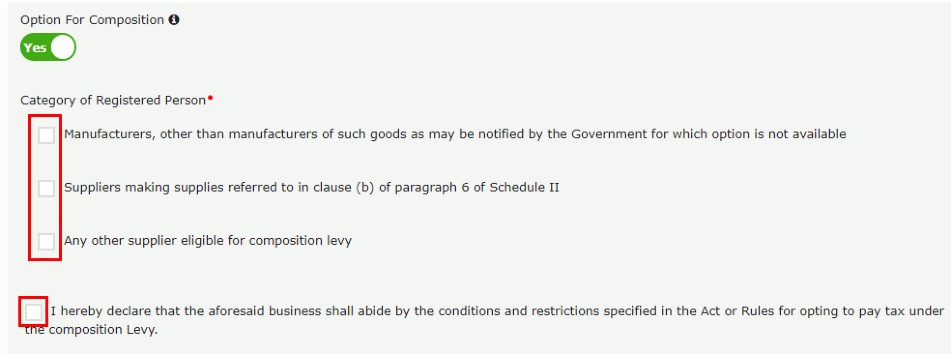
- Select ‘Yes/No’ to opt-in or out of the composition scheme. Further, choose the relevant type of registered person.
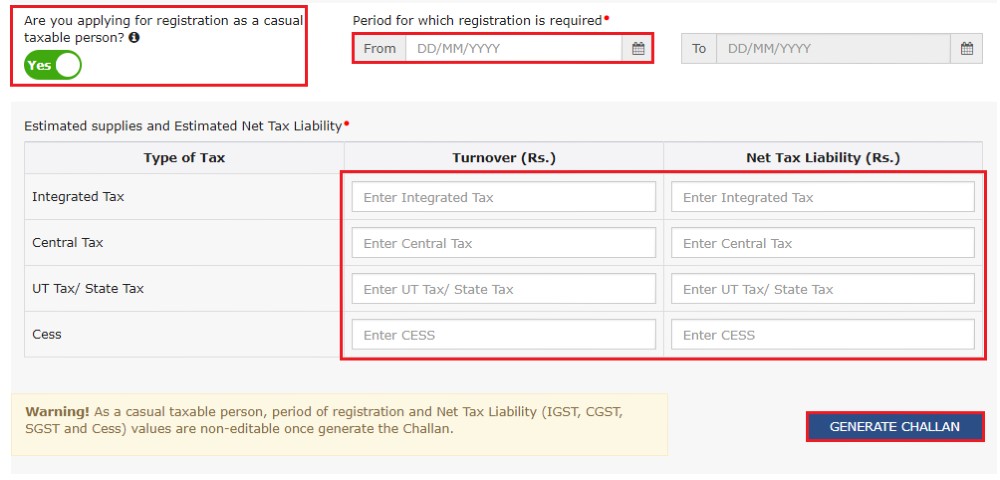
- Next up, enter the date of commencement of business and the date from which liability arises. Also, select ‘Yes/No’ for the type of registration as a casual taxable person and if ‘Yes’ is chosen, then generate the challan by entering the details for advance tax payment as per the GST law for casual taxable persons.
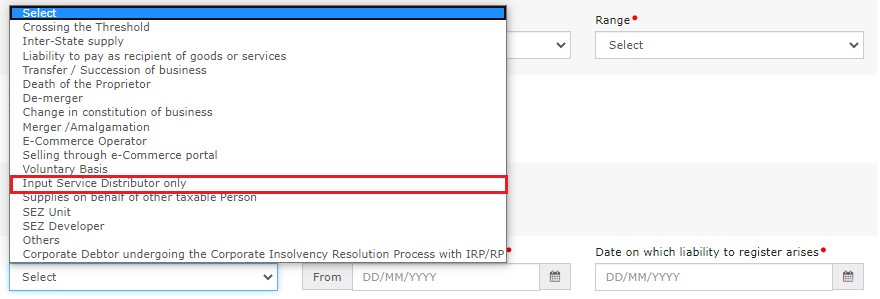
- Moving on, under the ‘Reason to obtain registration’, select the reason as ‘Input service distributor’ if that is the case. You can, alternatively, choose from the other available options.
- Depending on the selections that you have made, enter details in the fields that appear on your screen. For instance, if you select ‘SEZ unit’, then enter the name of the SEZ, designation of approving authority, approval order number, and upload the supporting documents.
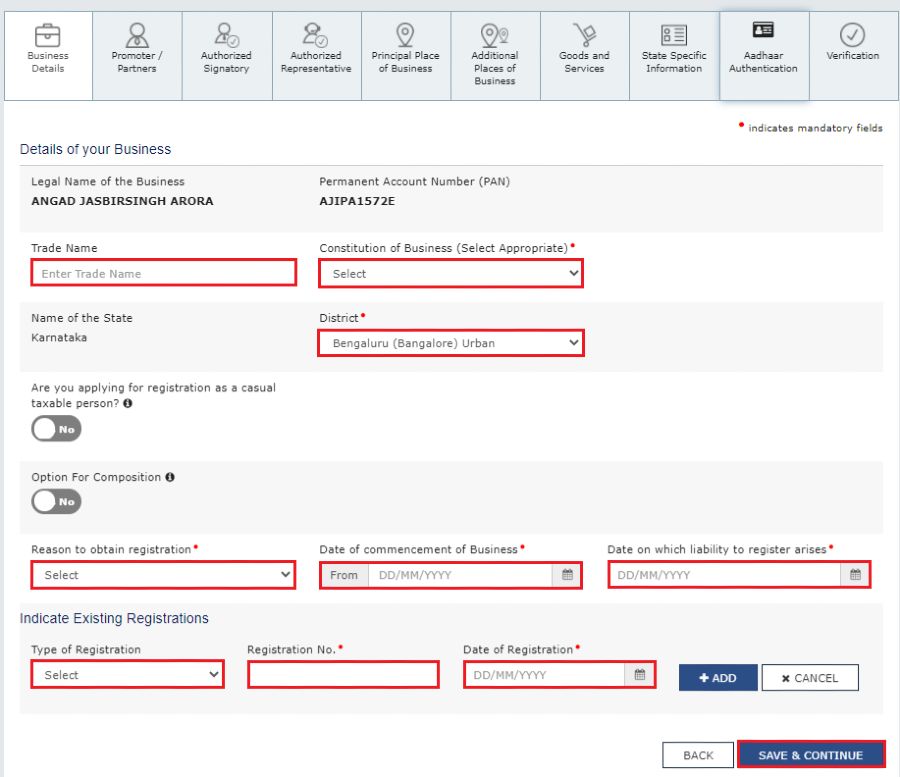
- Once the “SAVE & CONTINUE” tile turns blue, it means you have completed this particular section.
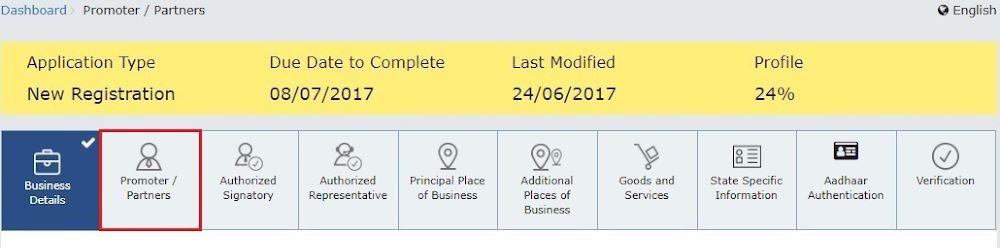
- Let us now come to the Promoters/Partners tab, you have the option to enter the details of up to 10 Promoters or Partners.
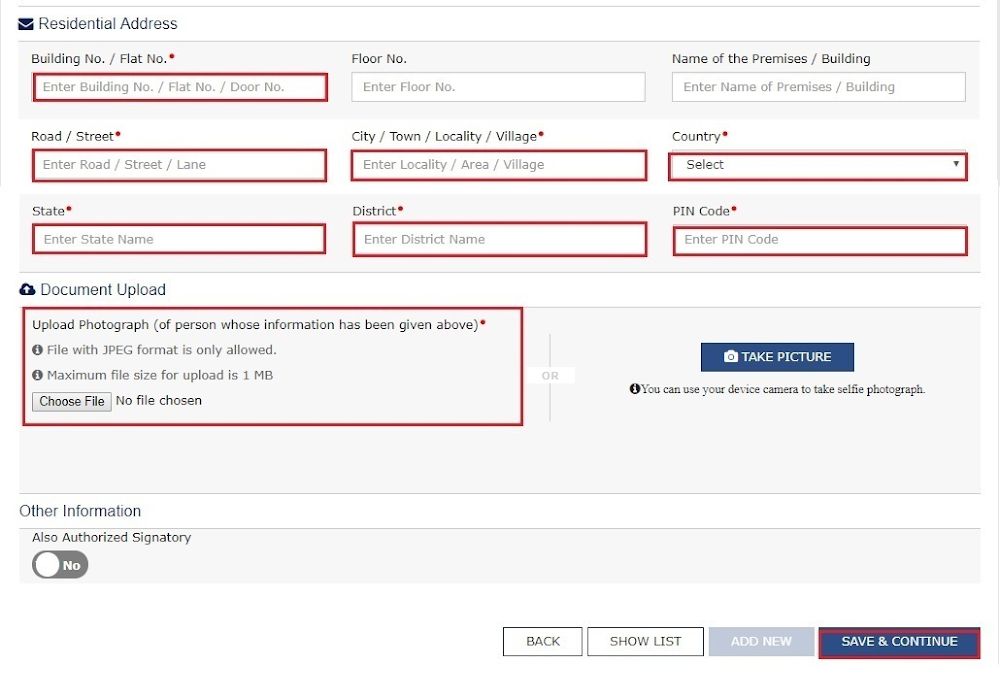
- Personal details such as name, address, mobile number, date of birth and identity details, such as Designation/Status, whether or not an Indian citizen, PAN and Aadhaar numbers must all be entered as well.

- Fill in the residential address and upload a photograph of the stakeholder. If the promoter is also the primary authorised signatory, then make the necessary selection. Click on the “SAVE & CONTINUE” button to proceed.
- You must now enter the details of the authorised signatory similar to the details entered for promoters/partners, in the above steps.
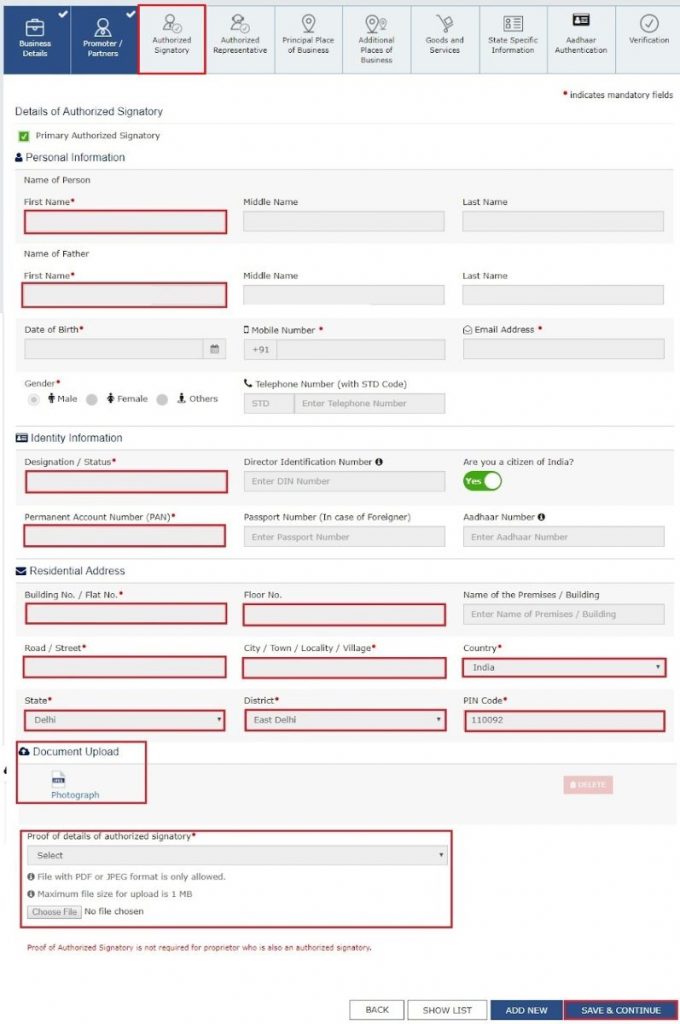
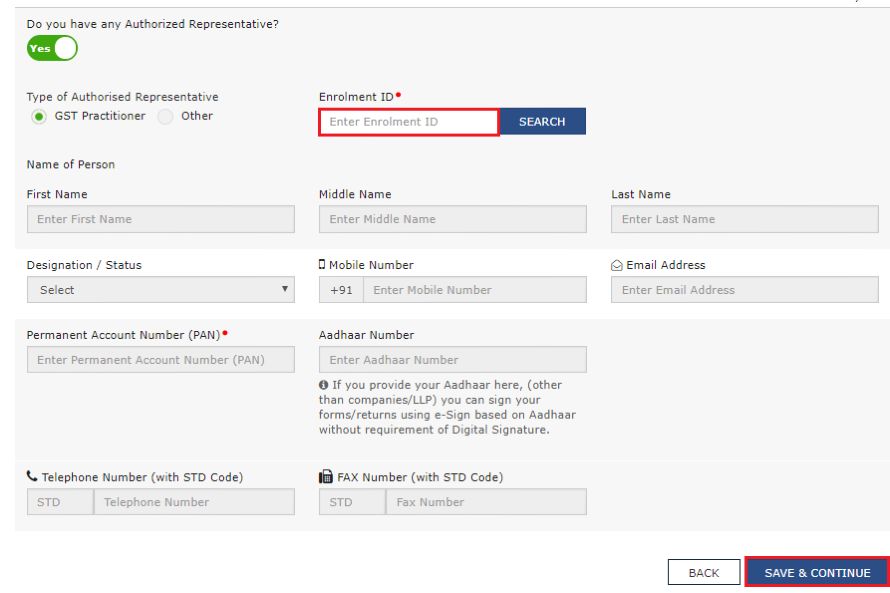
- If he or she is a GST practitioner, then enter the enrollment ID, and if he or she is an authorised representative, enter the basic details as asked.
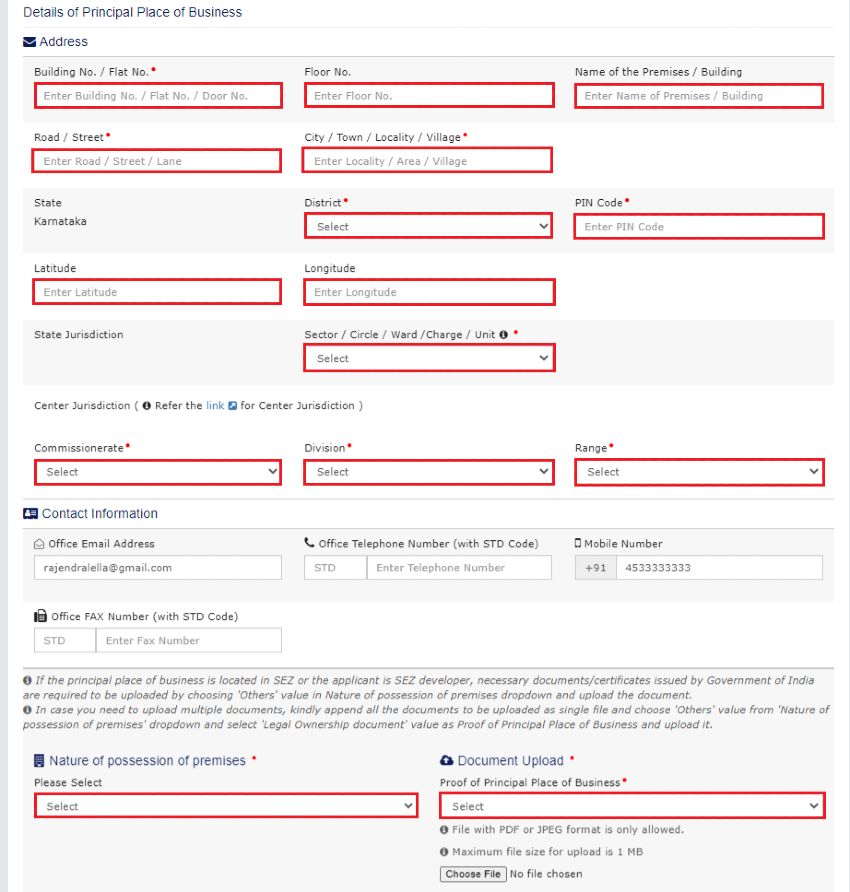
- Moving further by entering the Principal Place of Business details.

What is the Principal Place of Business?
The taxpayer’s principal place of business is the primary location within the state, where he or she conducts business. The principal place of business is the address where the company’s books of accounts and documents are stored, as well as where the company’s president or top management is based.
- Clearly enter the address, district, sector/circle/ward/charge/unit, commissionerate code, division code and range code of this place. Also, enter the official contact number of the taxpayer and nature of possession of premises as either rented, owned, or shared.
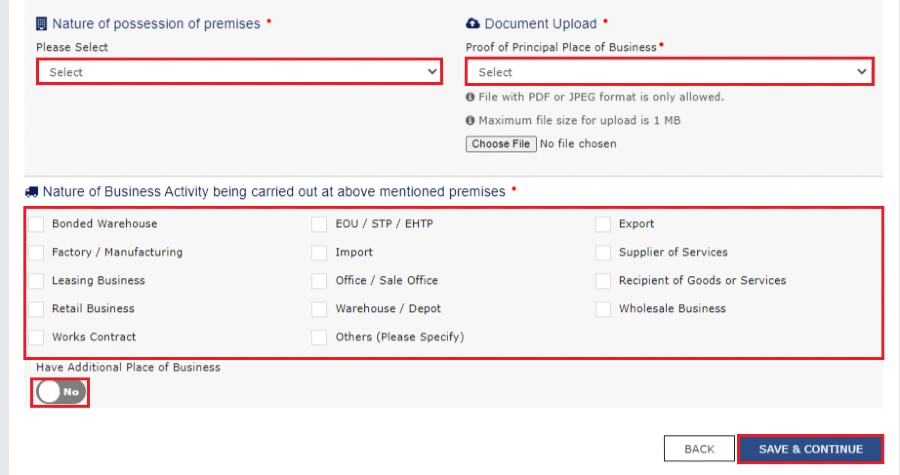
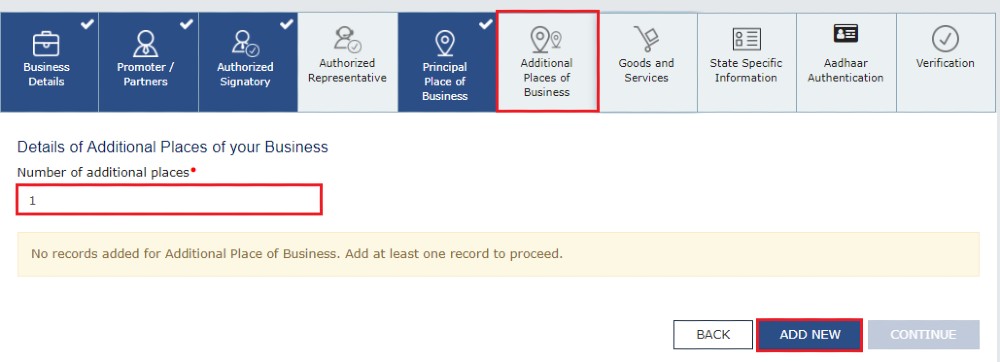
- Proceed further by uploading the supporting documents, including consent letter or NOC for business on-premises rented out, and upload the proof of SEZ Unit/SEZ Developer approval for the premises, if applicable. Additionally, checkmark the Nature of business activities on the premises and select “Have Additional Place of Business” if you have any. Click on the “SAVE & CONTINUE” button.
- If you have any additional places of businesses then add those places. After adding them click on the “SAVE & CONTINUE” button.
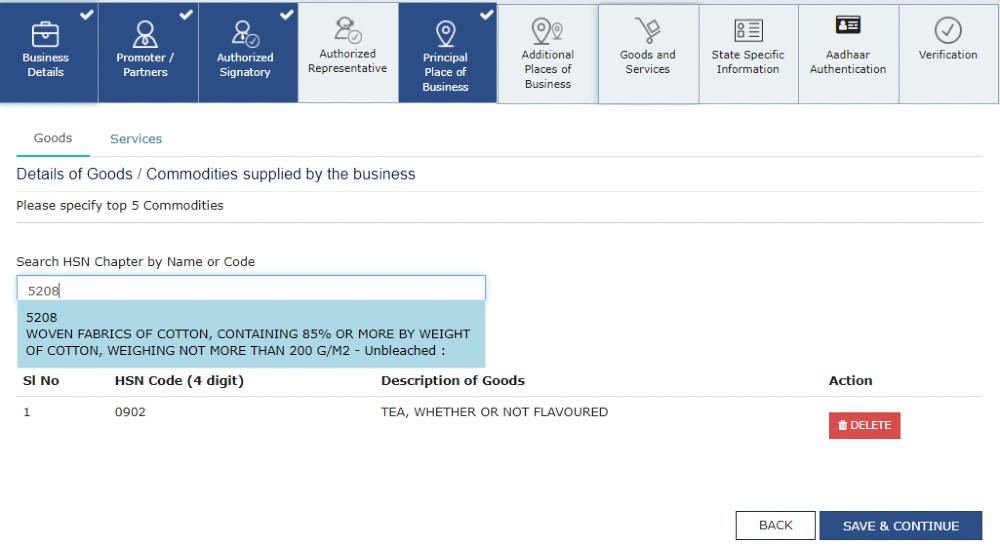
- Submit details of goods and services in the next tab, along with the HSN codes or SAC for up to a maximum of 5 goods and 5 services on the top of your list.
- If you are a composition scheme taxpayer, you will see a screen with a yellow bar on top.
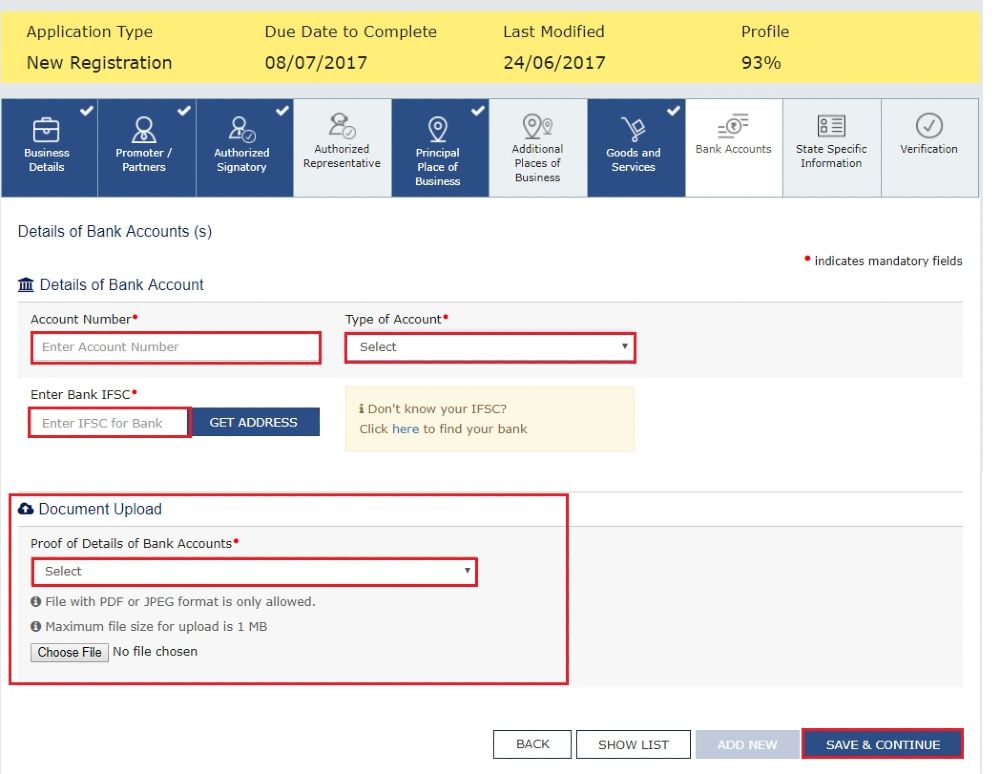
- Begin entering the details asked there. Enter the Bank details of the taxpayer for up to 10 bank accounts. Submission of bank accounts details has been made optional from 27th December 2018. If you do not report these details at the time of GST registration, then after GSTIN is granted, you will get a prompt to file a non-core amendment application to submit the bank details upon logging in for the first time on the GST portal.
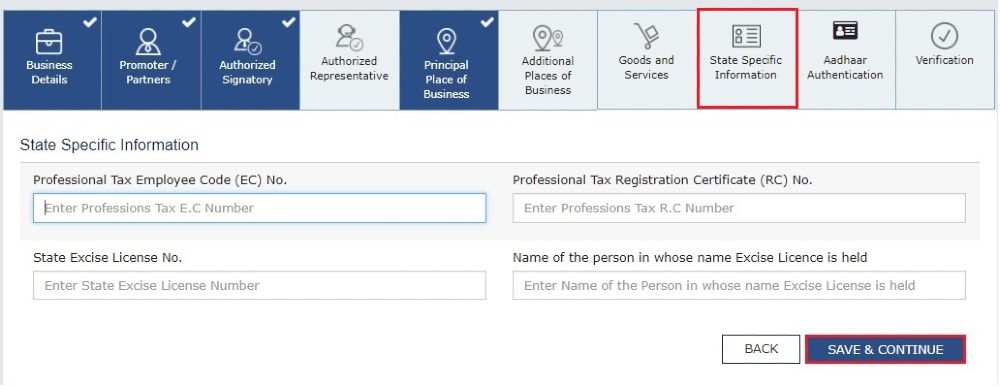
- You are now edging closer to completion. Now, under the State, Specific Information tab, enter the professional tax employee code number, PT registration certificate number and State Excise License number with the name holding the license. Then, click on “SAVE & CONTINUE”.
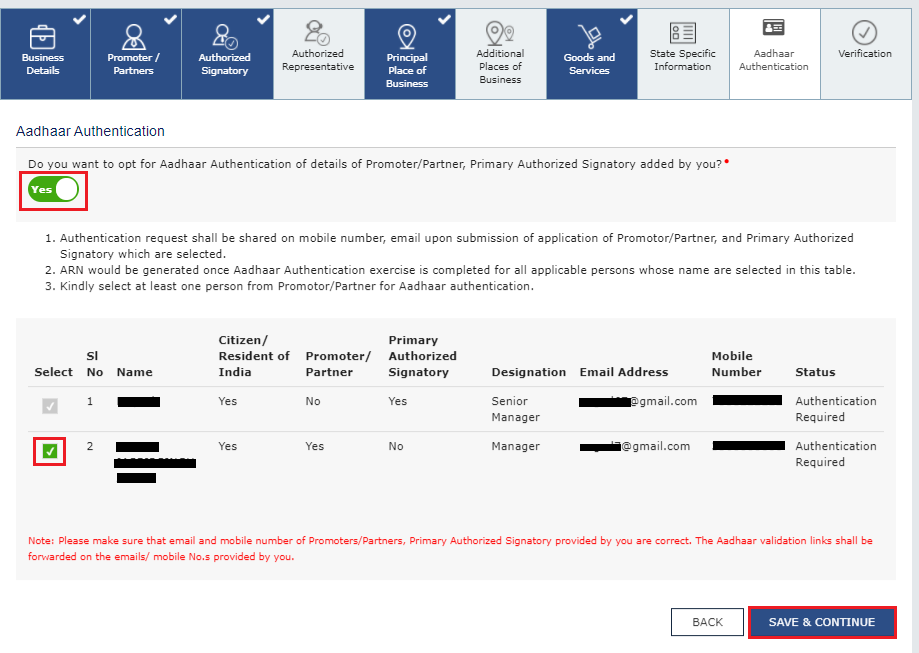
- Choose whether you are willing to do Aadhaar authentication.
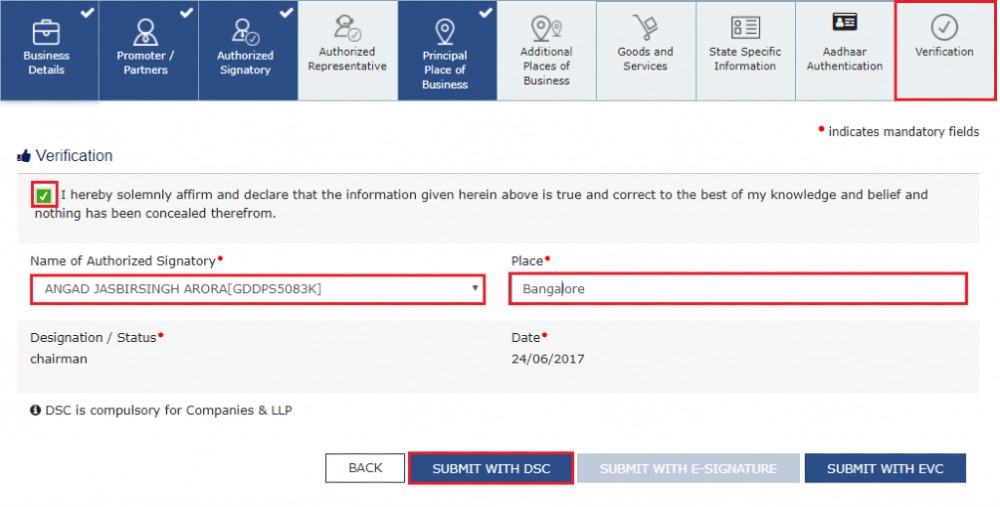
- Go to the Verification page now and fill up all the details. Tick the declaration and submit the application using any of the mentioned processes:
- An application must be submitted using DSC by Companies and LLC
- Using e-Sign – You will get an OTP on your Aadhaar registered mobile number
- Using EVC – You will get an OTP on your registered mobile number
- You will now see a message that says the application has been successfully submitted. Keep the Application Reference Number(ARN) handy with you.
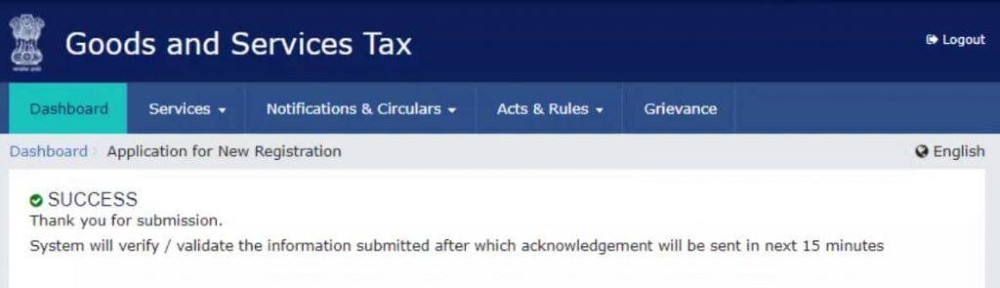
- By entering your ARN on the GST website, you can check the progress of your registration.
 was launched in India on 1st July 2017. It is an indirect federal sales tax that is much easier to understand and comply with. Every business that has a turnover of ₹40 lakhs or more (₹10 lakhs for businesses in the North East and hill states) needs to pay GST. […]</p>
)